How to Integrate an AI Chatbot to Your Website by Training It with Text, Q&As, and PDFs
By - Blink AI Team / First Created on - August 24, 2025
Introduction
Chatbots are no longer optional—they are a must-have for websites that want to deliver 24/7 customer support, instant query resolution, and engaging user experiences. Instead of relying on generic bots, you can now train an AI chatbot with your own data—including text, FAQs, and PDFs—and integrate it into your website in just a few steps.
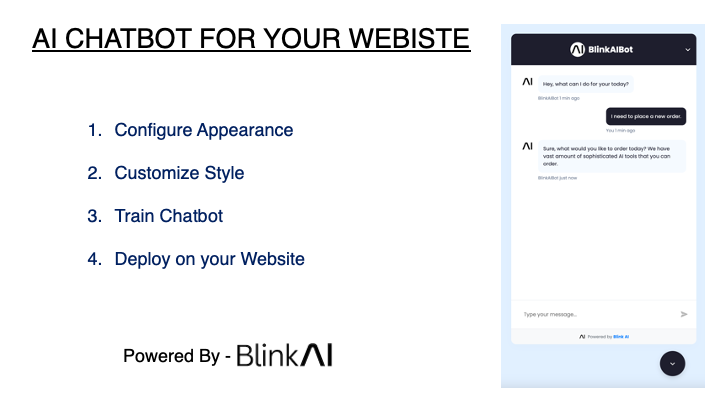
In this guide, we’ll show you Step 1 to Step 4 of how to:
-
Configure chatbot appearance
-
Customize styles to match your brand
-
Train chatbot with a knowledge base (PDFs, text, Q&A)
-
Embed chatbot on your website
By the end, you’ll have a fully functional AI chatbot tailored to your business needs.
Step 1: Configure Chatbot Appearance
Define Chatbot Identity
-
Chatbot Title (Heading): Example – BlinkAIBot
-
AI Chatbot Name (Visible in replies): Example – BlinkAIBot
-
Instructions: Tell the bot how to behave. Example:“You have to give responses as a customer care executive of the company.”
Set User Experience Options
-
Restrict to Data Source and Instructions → Ensures chatbot replies only from your provided content.
-
Fallback Message → Example:“Sorry, I don’t have that information right now. Can I connect you with support?”
-
Greeting Message → Example:“Hey, what can I do for you today?”
-
Bubble Message → Example:“Hey there! How can I help you?”
-
User Message Placeholder → Example: Type your message...
Choose Chatbot Model & Language
-
AI Model → OpenAI GPT-4o (recommended)
-
Interaction Type → Only AI or AI + Human handover
-
Interface Language → English / multilingual
✅ This step ensures your chatbot feels human-like, approachable, and aligned with your brand tone.
Step 2: Customize Chatbot Styles
Match Chatbot to Your Brand
-
Main Header Logo → Upload your company logo
-
AI Avatar → Choose from default avatars or upload custom
Choose Color Scheme
-
Header background
-
Header text
-
AI background
-
AI text
-
User background
-
User text
Personalization Options
-
Show/Hide Powered by BlinkAI
-
Add Footer Link (e.g.,
https://blinkai.co) -
Widget Position → Left or right side
✅ A well-styled chatbot blends seamlessly with your website and strengthens brand trust.
Step 3: Train Chatbot with Knowledge
Here’s the most important step—making your chatbot smart by training it with your content.
Supported Data Sources
-
PDFs → Upload product manuals, policy documents, eBooks
-
Text → Paste FAQs, service descriptions, company details
-
Q&A → Input question-answer pairs for direct responses
-
URLs (coming soon) → Automatically fetch content from your website
-
YouTube (coming soon) → Train chatbot from video transcripts
Why Train Chatbot with Your Data?
-
Provides accurate answers instead of generic replies
-
Helps customers find information faster
-
Acts as a virtual customer care executive
✅ The more text, Q&A, and PDFs you provide, the better your chatbot performs.
Step 4: Embed Chatbot on Your Website
Once your chatbot is trained and styled, it’s time to go live.
Add Chatbot Script to Website
Simply copy the provided widget code into your website:
Paste this snippet before the closing
</body> tag of your site.Where to Place the Chatbot
-
Right corner (default) → Best for customer support
-
Left corner → Good for eCommerce & service sites
✅ Within seconds, your chatbot will be live and ready to assist visitors.
Final Thoughts
By following these 4 steps, you can integrate a chatbot to your website that is not only visually appealing but also trained with your company’s knowledge base. Whether you upload PDFs, add FAQs, or enter direct Q&As, your chatbot will act as a digital customer care executive—helping customers 24/7.
If you want to:
-
Train AI chatbot with PDFs, Q&As, and text
-
Embed chatbot on website easily
-
Provide round-the-clock customer support
👉 Then BlinkAI is the perfect solution to get started.